In this tutorial we use our Arduino to show an image slideshow on a 1.8 inch tft module with SD card support (HY-1.8 SPI). We will change the size and the format of the images and copy them to the SD card. After that the Arduino loads them from the card and shows them on the display.
")
Image slideshow with an Arduino on a 1.8 inch tft display (HY-1.8 SPI)
Our display has a resolution of 128×160 pixels, so we create a couple (or at least one) images with the same resolution. We export the images in 24bit uncompressed bitmap format as BMP (R8G8B8) and then copy them to an SD card.
For the lazy people, i have prepared 3 images for download: Picture1, Picture2, Picture3 (Italy on the Mediterranean Sea at the end of summer 2012 (c) Ronny Simon).
Then we wire our Arduino and TFT display as indicated in the table below.
Wiring:
| Arduino (Mini, Nano, Uno) | HY-1.8 SPI with SD adapter |
| D4 | Pin 14 (SD CS) |
| D9 | Pin 07 (A0) |
| D10 (SS) | Pin 10 (CS) |
| D11 (MOSI) | Pin 08 (SDA), Pin 13 (SD MOSI) |
| D12 (MISO) | Pin 12 (SD MISO) |
| D13 (SCK) | Pin 09 (SCK), Pin 11 (SD SCK) |
| D8 | Pin 06 (RESET) |
| 5V (VCC) | Pin 02 (VCC) |
| GND | Pin 01 (GND) |
| 5V (VCC) | Pin 15 (LED+) |
| GND | Pin 16 (LED-) |
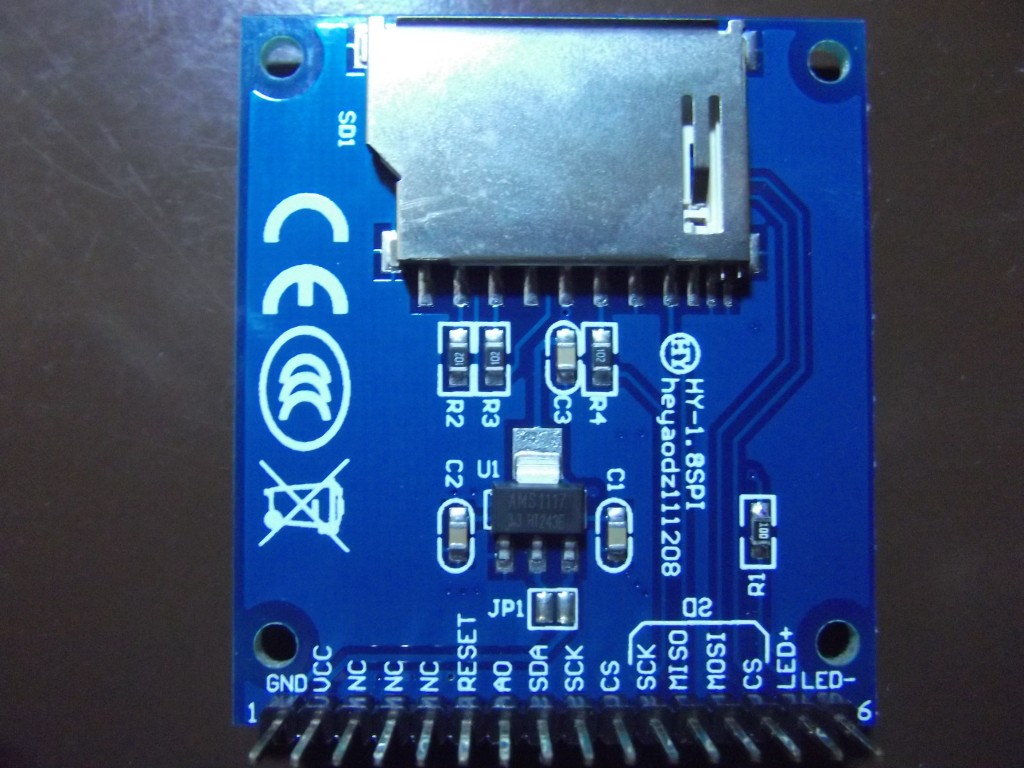
Pinout 1.8 inch TFT color display
We insert the SD card with the images in the SD slot and need to download 2 libraries to control the display. This is on the one hand the [SIMTRONYX_LIBRARY src=”Adafruit_ST7735.zip” name=”Adafruit library for controlling the display chipset”] (ST7735) and also a [SIMTRONYX_LIBRARY src=”Adafruit_GFX.zip” name=”graphics library from Adafruit”]. After we have added them to the Arduino libraries, we upload the following sketch to our Arduino:
Source code (Sketch):
#include <Adafruit_GFX.h>    // Core graphics library
#include <Adafruit_ST7735.h> // Hardware-specific library
#include <SPI.h>
#include <SD.h>


#define SD_CS    4  // Chip select line for SD card
#define TFT_CS  10  // Chip select line for TFT display
#define TFT_DC   9  // Data/command line for TFT
#define TFT_RST  8  // Reset line for TFT (or connect to +5V)

Adafruit_ST7735 tft = Adafruit_ST7735(TFT_CS, TFT_DC, TFT_RST);

void setup(void) {
  Serial.begin(9600);

  tft.initR(INITR_BLACKTAB);   // initialize a ST7735S chip, black tab

  Serial.print("Initializing SD card...");
  if (!SD.begin(SD_CS)) {
    Serial.println("failed!");
    return;
  }
  Serial.println("OK!");

}

void loop() {

  File dir=SD.open("/");
  dir.rewindDirectory();

  while(true) {
     File entry =  dir.openNextFile();
     if (! entry) {
       // no more files
       //Serial.println("**nomorefiles**");
       break;
     }
     // Print the 8.3 name
     Serial.print(entry.name());
     // Recurse for directories, otherwise print the file size
     if (entry.isDirectory()) {
       Serial.println("/");
     }
	 else{
       // files have sizes, directories do not
       Serial.print("\t\t");
       Serial.println(entry.size(), DEC);
	   if(bmpDraw(entry.name(),0,0))delay(5000);
     }
     entry.close();
   }
  /*
  bmpDraw("image_1.bmp", 0, 0);
  delay(5000);
  bmpDraw("image_2.bmp", 0, 0);
  delay(5000);
  bmpDraw("image_3.bmp", 0, 0);
  delay(5000);
  */
}

// This function opens a Windows Bitmap (BMP) file and
// displays it at the given coordinates.  It's sped up
// by reading many pixels worth of data at a time
// (rather than pixel by pixel).  Increasing the buffer
// size takes more of the Arduino's precious RAM but
// makes loading a little faster.  20 pixels seems a
// good balance.

#define BUFFPIXEL 20

boolean bmpDraw(char *filename, uint8_t x, uint8_t y) {

  File     bmpFile;
  int      bmpWidth, bmpHeight;   // W+H in pixels
  uint8_t  bmpDepth;              // Bit depth (currently must be 24)
  uint32_t bmpImageoffset;        // Start of image data in file
  uint32_t rowSize;               // Not always = bmpWidth; may have padding
  uint8_t  sdbuffer[3*BUFFPIXEL]; // pixel buffer (R+G+B per pixel)
  uint8_t  buffidx = sizeof(sdbuffer); // Current position in sdbuffer
  boolean  goodBmp = false;       // Set to true on valid header parse
  boolean  flip    = true;        // BMP is stored bottom-to-top
  int      w, h, row, col;
  uint8_t  r, g, b;
  uint32_t pos = 0, startTime = millis();

  if((x >= tft.width()) || (y >= tft.height())) return false;

  Serial.println();
  Serial.print("Loading image '");
  Serial.print(filename);
  Serial.println('\'');

  // Open requested file on SD card
  if ((bmpFile = SD.open(filename)) == NULL) {
    Serial.print("File not found");
    return false;
  }

  // Parse BMP header
  if(read16(bmpFile) == 0x4D42) { // BMP signature
    Serial.print("File size: "); Serial.println(read32(bmpFile));
    (void)read32(bmpFile); // Read & ignore creator bytes
    bmpImageoffset = read32(bmpFile); // Start of image data
    Serial.print("Image Offset: "); Serial.println(bmpImageoffset, DEC);
    // Read DIB header
    Serial.print("Header size: "); Serial.println(read32(bmpFile));
    bmpWidth  = read32(bmpFile);
    bmpHeight = read32(bmpFile);
    if(read16(bmpFile) == 1) { // # planes -- must be '1'
      bmpDepth = read16(bmpFile); // bits per pixel
      Serial.print("Bit Depth: "); Serial.println(bmpDepth);
      if((bmpDepth == 24) && (read32(bmpFile) == 0)) { // 0 = uncompressed

        goodBmp = true; // Supported BMP format -- proceed!
        Serial.print("Image size: ");
        Serial.print(bmpWidth);
        Serial.print('x');
        Serial.println(bmpHeight);

        // BMP rows are padded (if needed) to 4-byte boundary
        rowSize = (bmpWidth * 3 + 3) & ~3;

        // If bmpHeight is negative, image is in top-down order.
        // This is not canon but has been observed in the wild.
        if(bmpHeight < 0) {
          bmpHeight = -bmpHeight;
          flip      = false;
        }

        // Crop area to be loaded
        w = bmpWidth;
        h = bmpHeight;
        if((x+w-1) >= tft.width())  w = tft.width()  - x;
        if((y+h-1) >= tft.height()) h = tft.height() - y;

        // Set TFT address window to clipped image bounds
        tft.setAddrWindow(x, y, x+w-1, y+h-1);

        for (row=0; row<h; row++) { // For each scanline...

          // Seek to start of scan line.  It might seem labor-
          // intensive to be doing this on every line, but this
          // method covers a lot of gritty details like cropping
          // and scanline padding.  Also, the seek only takes
          // place if the file position actually needs to change
          // (avoids a lot of cluster math in SD library).
          if(flip) // Bitmap is stored bottom-to-top order (normal BMP)
            pos = bmpImageoffset + (bmpHeight - 1 - row) * rowSize;
          else     // Bitmap is stored top-to-bottom
            pos = bmpImageoffset + row * rowSize;
          if(bmpFile.position() != pos) { // Need seek?
            bmpFile.seek(pos);
            buffidx = sizeof(sdbuffer); // Force buffer reload
          }

          for (col=0; col<w; col++) { // For each pixel...
            // Time to read more pixel data?
            if (buffidx >= sizeof(sdbuffer)) { // Indeed
              bmpFile.read(sdbuffer, sizeof(sdbuffer));
              buffidx = 0; // Set index to beginning
            }

            // Convert pixel from BMP to TFT format, push to display
            b = sdbuffer[buffidx++];
            g = sdbuffer[buffidx++];
            r = sdbuffer[buffidx++];
            tft.pushColor(tft.Color565(r,g,b));
          } // end pixel
        } // end scanline
        Serial.print("Loaded in ");
        Serial.print(millis() - startTime);
        Serial.println(" ms");
      } // end goodBmp
    }
  }

  bmpFile.close();

  if(!goodBmp)Serial.println("BMP format not recognized.");

  return goodBmp;
}

// These read 16- and 32-bit types from the SD card file.
// BMP data is stored little-endian, Arduino is little-endian too.
// May need to reverse subscript order if porting elsewhere.

uint16_t read16(File f) {
  uint16_t result;
  ((uint8_t *)&result)[0] = f.read(); // LSB
  ((uint8_t *)&result)[1] = f.read(); // MSB
  return result;
}

uint32_t read32(File f) {
  uint32_t result;
  ((uint8_t *)&result)[0] = f.read(); // LSB
  ((uint8_t *)&result)[1] = f.read();
  ((uint8_t *)&result)[2] = f.read();
  ((uint8_t *)&result)[3] = f.read(); // MSB
  return result;
}
The program automatically searches all files in the root directory of the SD card and shows them – if they are BMP images in the correct format – one after the other on the display. Then it starts again with the first picture. In addition it displays status messages over the serial port, which may be helpful when something goes wrong. The sketch is based on the “spitftbitmap” example from the Adafruit-ST7735 library.
So and now have fun with the Arduino slide show!
Components:
| eBay: | 1.8 inch TFT SPI display Arduino Breadboard Breadboard jumper wires Breadboard power module |
| Amazon: | Arduino Breadboard Breadboard jumper wires Breadboard power module |
Good?
 Deutsch
 English