On the way to a small weather station we deal today with the air pressure and temperature measurement and use a breakout board for the BMP085 with an I²C interface, and an Arduino of our choice.
")
Sensors: Pressure and temperature measurement with the BMP085 (GY-65 breakout board)
First, we wire up the breakout board with the Arduino (in this case an Arduino Nano clone) according to the following schedule (also seen in the picture above):
Wiring (Arduino and GY-65 breakout board):
| Arduino (Pro Mini, Nano, Uno) | Arduino (Mega, Mega 2560) | GY-65 with BMP085 |
| VCC 5V | VCC 5V | VCC |
| GND | GND | GND |
| A4 (SDA) | D20 (SDA) | SDA |
| A5 (SCL) | D21 (SCL) | SDL (SCL) |

GY-65 breakout board (BMP085) – Pinout
Attention, there are several other breakout boards on the market that do not have an integrated voltage regulator, then they must be operated at 3.3 V.
Then we install the Adafruit BMP085 library from GitHub and upload the following sketch on our Arduino:
Source code (Sketch):
#include <Wire.h>
#include <Adafruit_BMP085.h>  // Adafruit BMP085 library

Adafruit_BMP085 bmp;

void setup(){

 // init serial monitor
 Serial.begin(9600);

 // Sensor init
 if (!bmp.begin()) {
  Serial.println("No valid BMP085 sensor found!");
  while (true) {}
 }
}

void loop(){

 Serial.print("Temperature: ");
 Serial.print(bmp.readTemperature());
 Serial.print(" ");  // Here we have to cheat a little
 Serial.write(176);  // to show the "°" character
 Serial.println("C");

 Serial.print("Humidity: ");
 Serial.print(bmp.readPressure());
 Serial.println(" Pa");

 Serial.print("Height: ");
 Serial.print(bmp.readAltitude());
 Serial.println(" meter");

 Serial.println();
 delay(5000);      // wait 5 seconds
}
… then we open the serial monitor and:
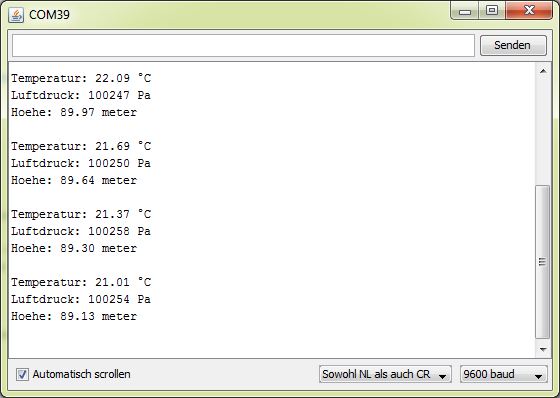
..see an output similar to the picture above.
However, the altitude is only an approximation.
Postgraduate project:
Simple indoor climate monitoring with an Arduino, BMP085, DHT11 and a RTC
Air pressure, temperature, humidity, time and date
Components:
| eBay: | Breadboard jumper wires |
| Amazon: |
Good?
 Deutsch
 English