The TLC5940 is a LED driver IC, which we use today to drive 5 RGB LEDs with common anode. The advantage of this circuit is that it provides a constant adjustable output current for the LEDs and only requires minimal wiring.

A TLC5940, 5 RGB-LEDs and an Arduino
The IC has 16 PWM outputs (from which we use 15), one of them for each of the three colors of the 5 LEDs. We build the following circuit:
Zoom level:
Move over elements (parts, jumper cable etc.) for more information (or tap in touch mode)...
| TLC5940NT | Arduino (Uno, Nano, Pro Mini, Olimexino-32U4, Leonardo)/ RGB LEDs (common Anode) / 5V Power |
| Pin 1 (OUT1) | RGB LED 1 – green |
| Pin 2 (OUT2) | RGB LED 1 – blue |
| Pin 3 (OUT3) | RGB LED 2 – red |
| Pin 4 (OUT4) | RGB LED 2 – green |
| Pin 5 (OUT5) | RGB LED 2 – blue |
| Pin 6 (OUT6) | RGB LED 3 – red |
| Pin 7 (OUT7) | RGB LED 3 – green |
| Pin 8 (OUT8) | RGB LED 3 – blue |
| Pin 9 (OUT9) | RGB LED 4 – red |
| Pin 10 (OUT10) | RGB LED 4 – green |
| Pin 11 (OUT11) | RGB LED 4 – blue |
| Pin 12 (OUT12) | RGB LED 5 – red |
| Pin 13 (OUT13) | RGB LED 5 – green |
| Pin 14 (OUT14) | RGB LED 5 – blue |
| Pin 15 (OUT15) | not connected |
| Pin 16 (XERR) | not connected |
| Pin 17 (SOUT) | not connected |
| Pin 18 (GSCLK) | Arduino – D3 |
| Pin 19 (DCPRG) | +5V |
| Pin 20 (IREF) | Resistor 2kOhm to Ground |
| Pin 21 (VCC) | +5V |
| Pin 22 (GND) | Ground |
| Pin 23 (BLANK) | Arduino – D10, Resistor 10kOhm to +5V |
| Pin 24 (XLAT) | Arduino – D9 |
| Pin 25 (SCLK) | Arduino – D13 |
| Pin 26 (SIN) | Arduino – D11 |
| Pin 27 (VPRG) | Ground |
| Pin 28 (OUT0) | RGB LED 1 – red |
The common anodes of the RGB LEDs are connected to +5 V and the Arduino is also still connected to the power supply.
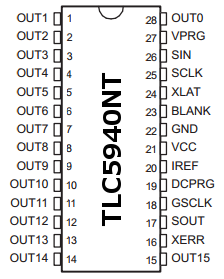
TLC5940NT – Pinout
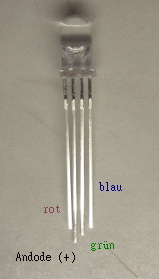
RGB-LED, common anode – Pinout
Source code (sketch):
We install the following TLC5940 library and then upload the sketch on our Arduino …
#include "Tlc5940.h"

#define NUM_LEDS 5

struct RGB { byte r; byte g; byte b; };

RGB rgb;
int global_dim=16;

void setup(){

	Tlc.init();
}

void loop(){

	randomSeed(millis());

	int wait=random(1,30);
	int dim=random(4,6);
	int max_cycles=8;
	int cycles=random(1,max_cycles+1);

	rainbowCycle(wait,cycles,dim);

}

void setLed(byte num,int red,int green,int blue){

	if(global_dim){
		red=red/global_dim;
		green=green/global_dim;
		blue=blue/global_dim;
	}

	Tlc.set(num*3,red);
	Tlc.set(num*3+1,green);
	Tlc.set(num*3+2,blue);

}

void rainbowCycle(uint8_t wait,byte cycle,byte dim) {

  int cycles, j, k;

  for(cycles=0;cycles<cycle;cycles++){

    byte dir=random(0,2);
    k=255;

    for (j=0; j < 256; j++,k--) {     // cycles of all colors in the wheel

      if(k<0)k=255;

   // Tlc.clear();

      for(int i=0; i<NUM_LEDS; i+=1) {

        Wheel(((i * 256 / NUM_LEDS) + (dir==0?j:k)) % 256,dim);
        setLed(i,rgb.r*16,rgb.g*16,rgb.b*16);


      }
	Tlc.update();
      delay(wait);
    }
  }
}


void Wheel(byte WheelPos,byte dim){

  if (WheelPos < 85) {
   rgb.r=0;
   rgb.g=WheelPos * 3/dim;
   rgb.b=(255 - WheelPos * 3)/dim;;
   return;
  }
  else if (WheelPos < 170) {
   WheelPos -= 85;
   rgb.r=WheelPos * 3/dim;
   rgb.g=(255 - WheelPos * 3)/dim;
   rgb.b=0;
   return;
  }
  else {
   WheelPos -= 170;
   rgb.r=(255 - WheelPos * 3)/dim;
   rgb.g=0;
   rgb.b=WheelPos * 3/dim;
   return;
  }
}
… and soon will be running a rainbow color transition on our LEDs.
Components:
Good?
 Deutsch
 English